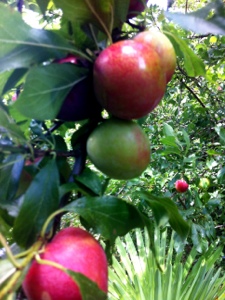
We have a lovely garden, and are lucky enough to have a few fruit trees. When we moved here 12 years ago, there were 2 stumps at the bottom of the garden. We decided to let them grow, and it didn’t seem to take long for new branches to sprout. The stumps are now two large trees, which produce red plums every year. It is a true delight for me to just wander to the back of the garden and pick the plums straight from the tree and eat them, then and there!
This year we have had a great crop on the bigger plum tree, and even I couldn’t eat the quantity that the tree has produced this season. Moreover I didn’t want the birds to eat too many of the plums either, so it seemed a good idea to make some jam.
When our social plans one afternoon were cancelled, and my husband bed bound, here was my chance! I’d only made jam once before with the assistance of my father-n-law, many years ago. This time I was on my own. How hard can it be? Donna Hay was once again my inspiration! The recipe would make enough for 2 litres. The first step, was to take a trip to the local hardware store to buy some small jars for filling. I had visions of gifting to family and friends.
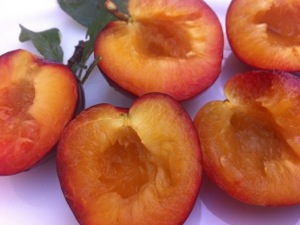
It certainly took a whole afternoon from start to finish. Picking the plums was a treat, stoning them was not. I did enjoy taking the photos however. I sterilised the jars, but I nearly forgot to do the lids.
The recipe seemed simple enough, until it came to the setting test. The jam had been simmering for at least 15 minutes longer than the recipe suggested. By this time I was tired, and losing patience. I started reading other recipes, and then realised that the filled jars should be subjected to a water bath afterwards. What? A rack and a deep pan were required for this. I did not have the equipment for this, so I decided not to do the water bath, and I would keep in the jam in the fridge. (It seems a water bath is required for final sealing of the jam, to ensure it can be kept longer). At this stage the jam was still not setting, and I was thinking of giving up on the whole procedure, just for a moment!

Then my eldest daughter Joanna came to the rescue. All that was required was to turn the heat up a little, and within 10 minutes the jam was done. Yippee. I think some of the jam disappeared, or maybe it was my constant tasting. I filled one small jar, and then one large jar, to make about 1.3 litres. I was really pleased with myself, and the jam tasted good. This jam has a tangy flavour, due to the lemon juice added. I had great pleasure in giving the small jar to my parents. My Dad just absolutely loves plum jam, so I hope he likes mine!
I think I will try making jam again, they say “practice makes perfect”.
The following recipe can be used for any stone fruit or berries.
PLUM JAM
1.5kg plums
1kg sugar
3/4 cup lemon juice
Wash the plums, and remove the stones. The best way to remove the stone is to cut the plum in half, and then twist the plum, so the stone can be removed. Slice the plums and together with the sugar and lemon juice place in a large deep frying pan. Bring ingredients to the boil over a medium heat, stirring until the sugar is dissolved. Simmer, stirring occasionally for 25-30 minutes or until thickened. To test whether jam is set place a spoonful on a cold saucer. Run your finger through the jam. If the line remains, the jam is set. Carefully pour jam into hot sterilised jars, and seal.


Hi Tracey! Welcome to NZFBA, we have added you to the members page and well done getting your blog started! Hope to see you at another event soon. Alli
Thanks Alli. I look forward to getting further inspiration from NZ food bloggers!